Have you ever experienced your laptop screen suddenly turned upside down? if ever, maybe this happened because of your accident while operating a laptop.
In computer or laptop devices, there are various features that we realize will never be used. One of these features is the screen rotation feature.

This feature can rotate the laptop screen from a normal display to display in various directions. One of them is making the laptop screen look like upside down.
As I mentioned at the beginning. Events like this, usually occur without the user knowing it. Usually, users accidentally press features or buttons on a laptop keyboard.
The result, suddenly the laptop screen can be reversed. Also, this can be caused by devices that have an automatic rotation feature. So how to overcome or restore a reversed laptop screen?
How to Overcome the Reverse Laptop Screen
There are some steps that you can try to restore a laptop screen that has unwittingly turned upside down. Here is a complete guide.
1. Adjust Rotation in Display Settings
The most common way to overcome screen problems like this is to adjust the position or rotation of the screen on the display menu. This menu itself is designed to regulate various matters relating to the screen display, including the position or rotation of the screen.
To enter this menu. You can do this through several steps. The first is to enter the keyword “Display settings” in the start search field in windows.
The next step is to right-click the mouse in the wallpaper display. Then select the Display settings menu.
So that the screen display returns to normal as usual. In the Display orientation section, change the option to Landscape without the flipped frills.

- Landscape: serves to change the laptop screen in a position or normal circumstances.
- Portrait: serves to turn the laptop screen in an oblique position to the left.
- Landscape (flipped): serves to turn the laptop screen in a position or state upside down.
- Portrait (flipped): function to turn the laptop screen in an oblique position to the right.
2. Restoring the Screen Through Graphic Options
The next step is to use graphic options. Each VGA usually has a different method. Here, if you use intel, you can find this feature by pressing the right-click mouse on the start page, and you will find Graphics Options.
There, you can select the Rotation > option then select Rotate to 0 Degrees. For additional information, you can listen below.
- Rotate to 0 Degrees: function to change the laptop screen in a position or normal circumstances.
- Rotate to 90 Degrees: function to turn the laptop screen in a tilted position to the left.
- Rotate to 180 Degrees: function to turn the laptop screen in a position or state upside down.
- Rotate to 270 Degrees: serves to turn the laptop screen in an oblique position to the right.
If you use NVIDIA, you can also do the same thing. Ie, by pressing the right click on the mouse on the home page. There you can choose the NVIDIA Control Panel option.
Next, select the Display > Rotate display > option then change to Landscape. Same as before.
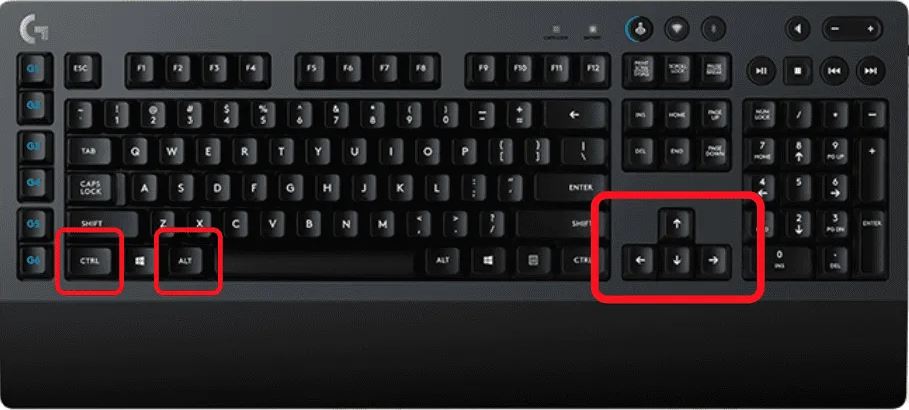
3. Press the Shortcut Button
On some laptops, you can restore the inverted screen by simply pressing the shortcut key on the keyboard. In this method, you only need to press the CTRL + ALT + direction (up / down / left / right).
- CTRL + ALT + Top [▲]: functions to make the laptop screen normal.
- CTRL + ALT + Down [▼]: functions to turn the laptop screen upside down.
- CTRL + ALT + Right [►]: functions to make the laptop screen tilt to the right.
- CTRL + ALT + Left [◄]: functions to make the laptop screen tilt left.
How to Lock Screen Rotation
So that similar incidents do not happen again. You can also lock the laptop screen so it doesn’t change or flip upside down. Then how do you lock the rotation of the laptop screen?
1. Lock Rotation Through Display Settings
To lock the rotation of the laptop screen so it does not mess. Open Display Settings by right-clicking at the beginning of the desktop or entering these keywords in the Windows search field.
Next, scroll the screen down until you find the Rotation lock setting. Then Activate the feature. Now you will no longer experience a reversed laptop screen.
2. Through the Taskbar
On Windows 10 itself, you can press the notification or message options located in the lower right corner of the screen. There you only need to press that option.
Then choose the Rotation lock option. After pressing the option, I guarantee, in the future, your laptop screen will no longer work itself without you knowing it.
Conclusion
Easy enough right? this method you can use on laptops that have OS Windows 7, Windows 8, Windows 8.1, or Windows 10 though.
Well, maybe it’s just this tutorial about Overcome the Reverse Laptop Screen. I would expect to see more articles. Hopefully, the tutorial is useful. If you want to request articles or provide suggestions & criticism please contact me at Contact Me. If anyone wants to ask please leave a comment, and do not forget like Facebook fan pages genkes.